Building Workflows
Create multi-step research workflows with conditional logic, approval gates, and API integrations.


Individual research projects are powerful, but some work requires orchestration — a sequence of steps that run in order, branch based on conditions, wait for human approval, or call external APIs. LumaVista’s workflow engine lets you build these multi-step processes as directed acyclic graphs (DAGs), where each step can be a research task, an LLM call, an API request, a delay, a condition check, or an approval gate.
If you find yourself running the same sequence of research tasks repeatedly, or you need a process that pauses for human review before proceeding, workflows are the tool for the job.
What is a workflow
A workflow is a directed graph of steps. Each step performs a specific action, and edges between steps define the execution order. Steps can have multiple downstream successors, and the graph can branch based on conditions — but it cannot loop back on itself (hence “acyclic”).
Here is a simple example: a competitive analysis workflow that researches three competitors in parallel, waits for all three to complete, then generates a comparison report, and finally sends the report to an external API.
And here is a more complex one: a due diligence workflow that starts with a company overview, branches into financial analysis and legal review running in parallel, feeds both results into an approval gate where a human reviewer checks the findings, and then — based on the approval decision — either generates a full report or flags the project for additional research.
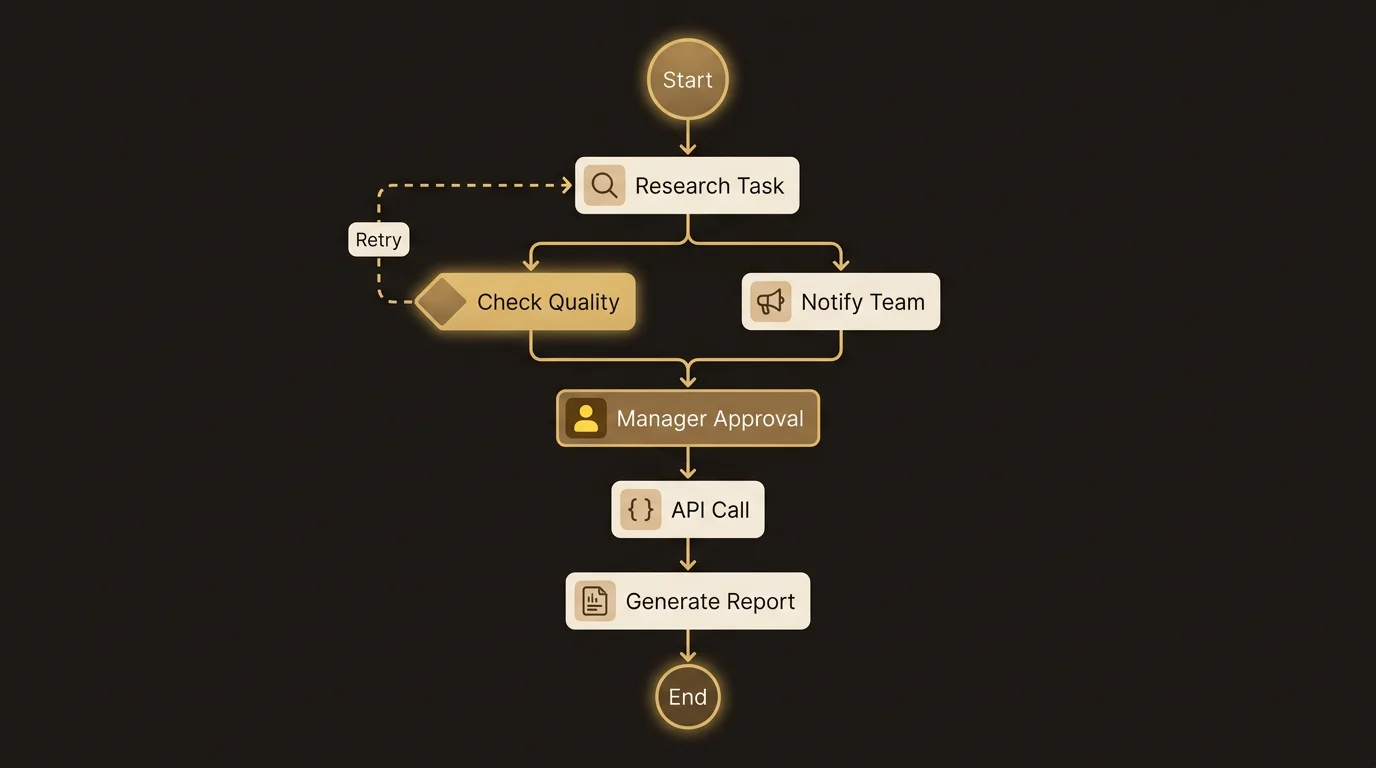
Step types
The workflow engine supports fourteen step types. Six of them are the control-flow and integration primitives most workflows are built from, and they are covered in detail below; the rest are described under the remaining step types.
Condition steps
Condition steps evaluate an expression and branch the workflow based on the result. The condition can reference outputs from previous steps using template expressions:
{{ steps.research.output.word_count > 1000 }}— branch based on research output length{{ steps.api_call.output.status == "approved" }}— branch based on an API response{{ steps.review.output.score >= 8 }}— branch based on a numeric threshold
A condition step has two outgoing edges: one for the “true” path and one for the “false” path. You can chain multiple conditions to build complex decision trees.
Delay steps
Delay steps pause the workflow for a specified duration. Useful when you need to wait between API calls (rate limiting), schedule a follow-up research task for later, or build a cooling-off period into an approval process.
Delays can be specified in seconds, minutes, hours, or days.
Approval steps
Approval steps suspend the workflow and wait for a human to approve or reject before proceeding. When a workflow reaches an approval step:
- The workflow pauses and its status changes to “suspended.”
- You receive a notification that approval is needed.
- You review the output from previous steps.
- You click Approve or Reject.
- The workflow resumes down the appropriate path.
Approval steps are secured with delegation tokens — a cryptographic mechanism that ensures only authorized users can approve a workflow. Each workflow generates its own scoped token, and approval requests are validated against it.
API call steps
API call steps make HTTP requests to external services. You configure:
- URL — the endpoint to call
- Method — GET, POST, PUT, DELETE
- Headers — including authentication tokens
- Body — the request payload, which can include template expressions referencing previous step outputs
The response is captured as the step’s output, making it available to downstream steps via template expressions. This lets you integrate LumaVista workflows with your existing tools — push results to Slack, create tickets in Jira, update a CRM, or trigger processes in other systems.
LLM steps
LLM steps send a prompt to a language model and capture the response. These are useful for intermediate processing — summarizing a previous step’s output, extracting structured data, translating content, or making a judgment call that does not require a full research project.
LLM steps use LumaVista’s configured language model provider, with cost tracking applied to the workflow.
External event steps
External event steps suspend the workflow and wait for an external signal before proceeding. This is useful for integrations where an external system needs to complete processing before your workflow can continue — for example, waiting for a webhook callback from a third-party service.
The remaining step types
The six above are the primitives. The other eight let a workflow reach the rest of the platform:
| Step type | What it does |
|---|---|
| Research | Runs a full research project as a step — planner, searchers, reasoning, report writer — and hands its output downstream. |
| Agent | Runs an AI agent with a set of tools rather than a single prompt. Tool calls that reach outside your account are gated (see below). |
| Connector | Acts in an external service you have connected — Slack, Google, GitHub. Gated. |
| MCP | Calls a tool on a connected MCP server. Gated, classified per server. |
| Documents | Converts, stores, indexes or searches documents in your library. |
| Code | Runs a deterministic transformation between steps, where a prompt would be the wrong tool. |
| Notify | Posts a notification into your workspace. Inside your account, so not gated. |
| Analytics | Records analytics events. |
The three marked “gated” are the ones that can reach outside your account, and they cannot send without an approval. That rule, and the three choices you get when a step asks, are the subject of Unattended Actions and Approvals — read it before you schedule anything that posts, mails, or writes to a calendar.
Data passing between steps
Steps communicate through template expressions. When you reference {{ steps.step_name.output.field }}, the workflow engine resolves the expression by looking up the named step’s output and extracting the specified field.
This allows you to build pipelines where each step builds on the results of previous steps:
- A research step produces findings.
- An LLM step summarizes those findings into a brief.
- A condition step checks whether the brief meets a quality threshold.
- An API call step sends the brief to an external system.
Template expressions are resolved at execution time, so you can design workflows before knowing what the actual values will be.
Creating a workflow
From the UI
- Navigate to the Workflows page from the main navigation.
- Click Create Workflow.
- Give your workflow a name and description.
- Add steps using the step builder. For each step, configure its type and parameters.
- Connect steps by defining edges — which step follows which, and under what conditions.
- Save your workflow as a draft.
The workflow editor includes a DAG preview that visualizes your workflow as a graph with color-coded nodes for each step type. This makes it easy to see the overall structure and catch errors before deploying.
From a template
LumaVista ships a library of workflow templates — capture chains that turn a recording into filed work, recurring routines like the morning sweep and calendar scan, output shapes like an executive deck, and ingest pipelines. Instantiate one and customise it. The full list is in Standard Operating Procedures.
From the chat
You can build workflows conversationally by describing what you want in the project chat. LumaVista’s SOP builder tools let you create and modify workflows through natural language. “Create a workflow that researches the top 5 competitors, waits for my approval, and then generates a comparison report” — and the system assembles the workflow for you.
Starting a workflow by talking
Workflows usually start on a schedule, from a webhook, or because you pressed run. There is one more entry point worth knowing about, because it changes what automation is for: a workflow can start when you finish a recording.
Record a meeting or a walk-and-think. When transcription completes, a workflow reads the transcript and acts on it — pulls out the commitments and files them as tasks, starts research on the thing you said you needed to look into, drafts the follow-up.
You brief it out loud. It does the filing.
Two separate consents, both required
This is the most capable thing LumaVista does and the one with the least friction at the point of use, so the permission model is deliberately awkward:
- Per recording. Each recording is individually marked as one that may be acted on. Not a global preference — a decision you make about this recording.
- Per workflow. Each workflow separately declares it accepts recording triggers.
Both must be on. Either one off and nothing fires. A recording you did not opt in is transcribed and stored and nothing else happens to it; a workflow that never opted in is never offered a transcript.
The reason for two keys rather than one: a single switch would mean that enabling automation for one meeting enables it for every meeting, and the moment you forget which state you left it in, you have a system acting on conversations you did not think about. Two keys make the default outcome nothing.
It cannot act on what it cannot read
If your account is encrypted and you are offline, a workflow triggered by a recording cannot read the transcript — the key is not there. It does not fail silently or act on partial data; it waits. Background execution does not change that today: a run it authorises also waits until you are back — see Unattended Actions and Approvals.
A workflow you bind to an always-on space is the exception: it runs while you’re away, inside that space. It reads the space, not your Private area, so it cannot read a transcript that stays in Private. See Private vs always-on — which to use.
And if the workflow’s last step reaches outside your account — mailing the summary, posting to a channel — that is gated too, by the send rules on the same page. Recording-triggered or not, nothing leaves without a person having seen it.
Availability. Recording-triggered workflows are in beta and off by default. They build on recordings, which are on by default. Ask and we will turn the workflow triggers on.
Workflow lifecycle
Drafts
New workflows start as drafts. You can save, edit, and preview a draft without it being available for execution. Drafts are versioned — each save creates a new draft version, and you can revert to a previous version if needed.
Publishing
When your workflow is ready, publish it. Publishing makes the workflow available for execution — manually, via triggers, or through the API. Publishing archives the current draft and creates a new published version.
Execution
Trigger a workflow manually from the Workflows page, or set up automatic triggers (see Triggers and Scheduling). Each execution creates a run — an instance of the workflow with its own state, step outputs, and execution history.
Suspend and resume
When a workflow reaches an approval step, a delay, or an external event step, it suspends. The workflow’s state is persisted — including all step outputs and the current position in the graph — so it can resume exactly where it left off. Even if the server restarts, suspended workflows pick up from their last checkpoint.
Workflow state is encrypted at rest using AES-256-GCM with per-workflow encryption keys. This means sensitive data passing through your workflow — API keys, research findings, approval decisions — is protected in storage.
The workflow management page
The Workflows page provides a complete management interface:
- List view. All your workflows with status indicators (draft, published, running, suspended, completed).
- Detail view. Four tabs for each workflow:
- Overview — name, description, status, and the DAG preview
- Editor — YAML-based workflow definition editor for advanced users
- Runs — execution history with status, timing, and output for each run
- Settings — trigger configuration, permissions, and deployment options
Monitoring runs
When a workflow is executing, you can monitor its progress in real time:
- Each step shows its current status (pending, running, completed, failed, suspended).
- Step outputs are visible as soon as they complete.
- Failed steps show error details.
- Suspended steps show what they are waiting for (approval, delay timer, external event).
If a step fails, the workflow stops at that point. You can review the error, fix the issue, and re-run the workflow.
Practical patterns
Sequential research pipeline
Research Topic A, then use findings to research Topic B, then aggregate both into a final report. Each step feeds its output to the next.
Parallel research with aggregation
Research three topics simultaneously, wait for all to complete, then aggregate findings into a single comparative report.
Approval-gated publishing
Generate a research report, suspend for human review, and only publish or distribute the report after approval.
Scheduled monitoring
Combine with a cron trigger (see Triggers and Scheduling) to run a competitive analysis weekly, compare results against the previous run, and alert you if significant changes are detected.
Getting your workflows out
Workflows are included in your account data export: a readable page for each workflow with its runs, and a machine-readable JSON file with the full records — the published spec, the draft, past versions, every run with its step outputs, and the trigger settings and firing history. Webhook tokens and signing secrets are never included. If a workflow could not be read, the export lists it with the reason instead of leaving it out silently. See Settings → Privacy & data, under Your data.
Related guides
- Triggers and Scheduling — automate when workflows run with cron, webhooks, and file triggers
- Standard Operating Procedures — turn workflows into reusable templates