Triggers and Scheduling
Set up cron schedules, webhooks, and file upload triggers to launch research automatically.


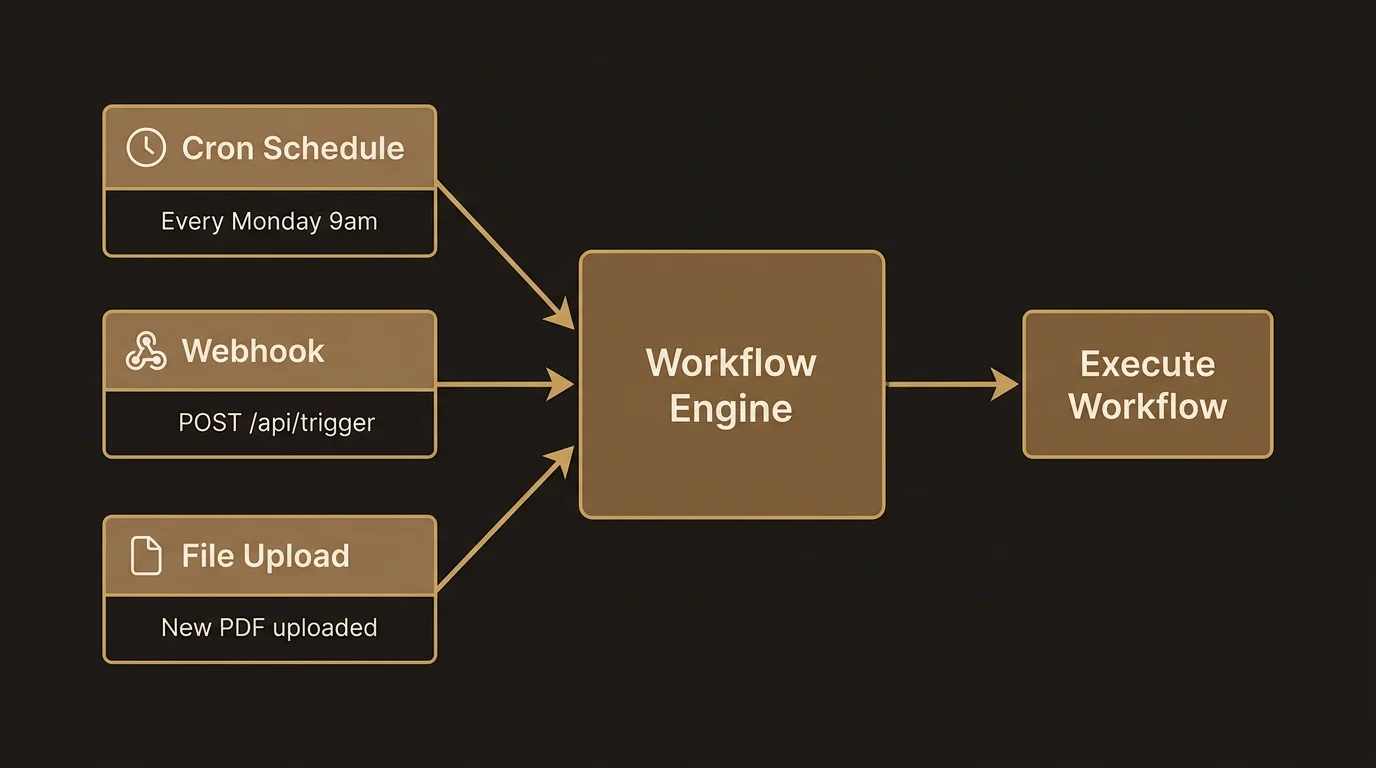
Workflows are most powerful when they run automatically. Instead of manually launching a competitive analysis every Monday or remembering to process a document when it arrives, you can set up triggers that start workflows on a schedule, in response to an external event, or when a file is uploaded.
LumaVista supports three trigger types: cron schedules, webhooks, and file upload triggers. Each one connects an event to a workflow — when the event occurs, the workflow starts automatically.
Cron schedules
Cron triggers run workflows on a recurring schedule. If you need a market analysis every Monday at 9 AM, a daily news digest, or a monthly competitive review, cron triggers handle it.
Setting up a cron schedule
- Open the workflow you want to schedule.
- Navigate to the Settings tab.
- Under Triggers, click Add Trigger and select Cron Schedule.
- Enter a cron expression defining when the workflow should run.
Cron expressions use the standard five-field format:
| Field | Values | Example |
|---|---|---|
| Minute | 0-59 | 0 (on the hour) |
| Hour | 0-23 | 9 (9 AM) |
| Day of month | 1-31 | 1 (first of the month) |
| Month | 1-12 | * (every month) |
| Day of week | 0-6 (Sunday=0) | 1 (Monday) |
Some common patterns:
0 9 * * 1— Every Monday at 9:00 AM0 8 * * *— Every day at 8:00 AM0 0 1 * *— First day of every month at midnight*/30 * * * *— Every 30 minutes
Persistence across restarts
Cron schedules are persisted and automatically re-registered when LumaVista restarts. You do not need to re-create your schedules after a server update or restart.
Webhooks
Webhook triggers start workflows when an external system sends an HTTP request to a LumaVista endpoint. This lets you connect workflows to virtually any external tool — a CRM that detects a new lead, a monitoring system that flags an anomaly, or a CI/CD pipeline that completes a build.
Setting up a webhook
- Add a webhook trigger to your workflow from the Settings tab.
- LumaVista generates a unique webhook URL for this trigger.
- Copy the URL and configure it in your external system as the callback destination.
- When the external system sends a POST request to that URL, the workflow starts.
Webhook security
Each webhook trigger generates a signing secret. When an external system sends a request, it should include an HMAC-SHA256 signature in the request headers (using the signing secret). LumaVista validates the signature before accepting the webhook, ensuring that only legitimate sources can trigger your workflows.
The signing secret is encrypted at rest and visible only once — when you first create the trigger. Store it securely in your external system’s configuration.
Webhook validation also includes replay protection: each request must include a timestamp, and requests older than a configurable window are rejected. This prevents attackers from capturing and replaying legitimate webhook payloads.
Webhook payloads
The body of the webhook request is available to your workflow as the trigger’s output. You can reference it in step template expressions:
{{ trigger.output.customer_name }} — extract a field from the webhook JSON body.
This means your workflows can be parameterized by external data. A webhook from a CRM could include a company name, and the workflow could use that name to run targeted research.
File upload triggers
File upload triggers start workflows when a document is uploaded and indexed in a project. This is useful for automated document processing pipelines — upload a batch of reports, and a workflow automatically analyzes each one.
How file triggers work
File triggers are connected to LumaVista’s document indexing pipeline. When a document finishes indexing (or when a raw upload is received, depending on your trigger configuration), the trigger evaluates its filter criteria. If the uploaded file matches, the workflow starts.
Filter criteria
You can narrow which uploads trigger the workflow:
- MIME type. Only trigger for specific file types — PDFs, Word documents, spreadsheets, etc.
- Filename pattern. Use glob patterns to match filenames:
*.pdf,report-*.docx,Q*-financials.*. - Collection. Only trigger for uploads to a specific document collection or project.
If no filters are set, the trigger fires for every upload. Combining filters lets you create precise automation — “start the financial analysis workflow when a PDF matching Q*-earnings.* is uploaded to the Finance project.”
Trigger events
File triggers can fire at two points:
- On raw upload. The trigger fires as soon as the file is received, before conversion and indexing. Useful when you want to start processing immediately.
- On indexed. The trigger fires after the file has been converted and indexed. Useful when your workflow needs to search the document’s content.
Managing triggers
Viewing active triggers
From the workflow Settings tab, you can see all triggers configured for that workflow. Each trigger shows its type, configuration, and status (active or paused).
Execution history
Every trigger maintains an execution history — a log of when it fired and which workflow run it started. The history is retained for 7 days, giving you a record of recent trigger activity.
Deduplication
For multi-instance deployments, LumaVista uses Redis-based deduplication to ensure that a trigger fires only once, even if multiple server instances receive the same event. This is handled automatically — you do not need to configure anything.
Ownership and deletion
Triggers are owned by the user who created them. Only the owner can delete a trigger. When you delete a trigger, any associated signing secrets are also removed, and the webhook URL (if applicable) stops accepting requests immediately.
Creating and managing triggers via the API
In addition to the Settings tab UI, triggers can be managed through LumaVista’s REST API. The API supports full CRUD operations:
- Create.
POST /api/v1/triggers— create a new trigger with type, configuration, and workflow association. - List.
GET /api/v1/triggers— list all triggers you own. - Get.
GET /api/v1/triggers/:id— get details of a specific trigger. - Delete.
DELETE /api/v1/triggers/:id— remove a trigger. Requires ownership verification.
The API is useful for programmatic trigger management — for example, a script that creates webhook triggers for each project in a workspace, or an admin tool that audits trigger configurations across the organization.
Combining triggers with workflows
The real power of triggers emerges when you combine them with workflow features:
- Cron + approval gates. Schedule a weekly research run, but require human approval before distributing the report.
- Webhook + conditional logic. Receive an event from an external system, check a condition (severity level, customer tier), and route the workflow down different paths.
- File upload + RAG. When a new document is uploaded and indexed, trigger a workflow that searches the document for specific information and generates a summary.
- Cron + version comparison. Schedule a monthly research run on the same topic, then use a condition step to compare findings against the previous month’s results and alert you only if significant changes are detected.
- Webhook + multi-step pipeline. Receive a webhook from your CRM when a deal reaches a specific stage, trigger a due diligence workflow that researches the company, waits for analyst approval, and then pushes the report back to the CRM via an API call step.
Practical tips
- Start with cron triggers. They are the simplest to set up and the easiest to debug. Once you are comfortable with automated workflows, add webhook and file triggers.
- Test webhooks with a tool like curl. Before configuring your external system, send a test POST request to the webhook URL to verify the workflow starts correctly. Include the HMAC signature to test validation.
- Use specific file filters. Broad file triggers (no filters) can generate unexpected workflow runs when routine documents are uploaded. Start with specific MIME type and filename filters, then broaden as needed.
- Monitor execution history. Check the 7-day execution history periodically to ensure your triggers are firing as expected. Missed triggers or unexpected runs are easier to diagnose when you review the history.
- Store signing secrets securely. Webhook signing secrets are shown only once. Store them in your external system’s secrets manager or environment configuration — not in plain text or source code.
For more on building the workflows that triggers launch, see Building Workflows.